Monday, March 28, 2011

Apple Upside-Down Cake

To honor my friends' (Bruce and Rosie) sweet tooth - for March supper, I decided to make a dessert.  The book has the recipe for pineapple upside-down cake but Rosie wasn't a fan of pineapple, so I decided to substitute apple for it instead.  The recipe did say it's a general template that can work well for other fruits too, but I was still pretty nervous how it will turn out.

The cake consisted of two parts, a "pan schmear" that's made out of light brown sugar and butter that sits right at the top of the cake, as well as a cake batter itself.  So I start with the schmear by combining butter, light brown sugar, honey and dark rum together.  Vanilla extract is also used to add the extra kick cake flavor.  The recipe only needs about 1/3 of the schmear but it was difficult to make less portion since it requires some mixing.
Pan schmear - light brown sugar, rum, honey and butter
The recipe asked for 1/3 of the total schmear to be spread across the bottom of a 9 inch cake pan, but I end up using about 1/2 of the total schmear since there doesn't seem to be enough to cover the entire pan.  Left over schmear can store up to 1 month in the freezer, so you can make another one of these delicious cakes the next day!
Thin layer of schmear in a 9 inch cake pan
Then we prepare the other 1/2 of the cake, which is the cake batter itself.  The batter needs cake flour - which is a different kind of wheat flour.  I was able to find it in my local market.  Using a mixer, whisk the cake flour together with baking powder, sugar, milk, vanilla extract and 2 large eggs.  It looks so good before it even goes in the oven!
Whisked cake batter
Now I prepare the apple slices to be inserted between the cake batter and the pan schmear.  I used 1 large skinned Fuji apple and cut them into 1/8th inch wedges to layer right on the schmear.
Fuji apple slices on top of the schmear
After pouring the cake batter right on top, we are ready to bake!
Cake ready to bake
After baking at 350 for about 15 minutes, we rotate the pan and bake for additional 25 minutes.  Then we take the cake out to cool.  It looks and smells wonderful.
Cake out of the oven and cooling
After cooling off, it's show time to see if the "upside down" cake will indeed turn over!  I was worried about it sticking but it slided off onto my plate like a dream :)  And omg it looks great as well!
Finished Apple Upside Down Cake
Tasting:
This was by far the biggest surprise of the evening.  The cake came out EXACTLY like the book has described and pictured.  The apple substitute was great if not better than the pineapple version and the cake itself is moist and not too sweet.  It was difficult just having one slice, the top schmear is so good.  I had no idea how easy it was to make a dessert from this book but I am glad I did :)

This cake was a great finish to my 4 course line up for March supper evening.
March four-course supper
How good was the meal?  Well the following should tell you :)  Oreo (my friend's beloved maltese helped with the clean up!)

Sunday, March 27, 2011

Pan-roasted Halibut

Since previous 3 meals have all been chicken, beef or lamb, for this month's supper, I decided to try a seafood recipe from the book.  This dish caught my eye right away because it looks very simple to make.  Like most seafood dishes, the freshness of the ingredient pretty much single handedly controls how good your dish will come out.  After visiting 3 stores and came away disappointed as Halibut just got in season right around March, I finally found some amazing Alaskan Halibut @ a local fish place.  (And yes at a crazy price, but it's worth it)
Expensive Alaskan Halibut!
Beautiful piece of fish!
I cut the fish into 12 equal pieces as the recipe calls for it.  It was very easy and the fish was definitely meaty like a steak.
Cutting the filet into equal chunks for frying
To present the dish, the recipe also recommends serving it on a bed of Chanterelle mushrooms and pea shoots.  I couldn't find pea shoots so I substituted spinach instead as the book suggested.  Chanterelle mushrooms are also not easy to find but usually a specialty store or Whole Foods will carry them.  They are pricey but definitely worth the splurge occasionally.  We sautee the mushrooms with shallots in a lot of butter.
Chanterelle mushrooms w/shallots and butter
Chicken stock is then added to make the mushrooms tender, add in baby spinach and wilt them.  You now have the perfect foundation for the Halibut.
Chanterelle mushrooms and spinach
We then move to pan frying the halibut.  Since we need to do them in two batches, we prepare a cooling rack so we can put the fish there before we set them in the oven to finish cooking.  Start with 6 pieces presentation side down in a frying pan with Canola oil.
Pan-frying Halibut Filets
After frying for a few minutes, we do the same for the 2nd batch and then set the fish in a 350 degree oven to finish cooking.  Once out of the oven, we return the fish back into the frying pan and "kiss" the other side for 30 seconds.  The result is amazing.  Serve them right on top of the mushroom mixture.
Finished pan-fried halibut with Chanterelle mushrooms
Tasting:
Crispy and buttery!  The fish was of really high quality so it did taste really fresh.  The mushrooms was an absolutely wonderful accompaniment, nutty and full of flavor.  It amazes me how simple cooking can be when the ingredients are fresh and made to shine.

Scallion Potato Cakes

This dish reminds me of the Chinese green onion pancakes that's a favorite amongst many.  I wanted a side item for the halibut main dish and this seemed like a good choice.  There are only 4 ingredients for this delicious side, and it's pretty easy to make if you got some basic tools.

First we start with the potatoes.  3 pounds of large russets.  You will need a grater of some sort or a food processor.  I was really surprised how good a hand grater worked.  It shredded the potatoes just to the right size, also invest in a salad spinner, it will make drying the potatoes a lot easier.
Grated potatoes using a hand grater
The potatoes changes color (to a reddish brown) very rapidly, so submerge them in cold water while you work in batches.  The salad spinner is used to completely dry off the potatoes once you are ready to make the cakes.  The binding ingredient for this cake is corn starch, which is very interesting because it completely changes the texture of the finished cakes, I absolutely love it!  Use a 10 inch non stick frying pan, make sure there's enough oil to cover the entire bottom of the pan, spread a thin layer of potatoes, then add the scallions, season with salt and pepper.  To make it into a cake, add another layer of potatoes right on top.
Potato cakes cooking in the frying pan
Each side will take about 5-6 minutes, if all goes well you should be able to flip it relatively easily in the pan.  Or you could use a cooling rack to slide it on and off from.
Browning the cake on both sides
Since there are quite a bit of potatoes to work on, it's a good idea to keep them warm in the over at 200 degrees while you work on them in batches.  The oven also adds additional crispiness to the potato cakes.
Keeping the potato cakes warm in the oven
Once all of the cakes are done, you can stack them in any number of layers and cut into wedges.  Garnish with additional scallions for final serving.
Finished scallion potato cakes
Tasting:
Delicious!!!  The corn starch definitely made a difference in this dish, it held the potatoes together but also added that extra bite/firmness to the cakes.  It probably would've been a lot better if you ate this right as it was made, but it's difficult keeping that crispiness if you let the dish sit for too long.  So try to enjoy it when it's fresh out of the oven!  This side dish was completely gone within 30 minutes of the supper start, so my friends absolutely loved it as well.

Endive and Arugula Salad

This is a very simple salad dish to make and looked lovely in the book, so I thought I would have it as the first course for my March Adhoc At Home supper evening.  The bitterness of the endives and arugula is offset by the sweetness of the peach dressing.

Recipe calls for a Peach Puree that you can make ahead of time.  It's basically mashed peaches with sugar, cinnamon and nutmeg.
Peach Puree cooking with sugar, nutmeg and cinnamon
This is what it looks like after it's pureed and cooled off.
Finished Peach Puree for Salad Dressing
I couldn't find red Belgian Endives, so I went for all white ones.  Local market's produce guy told me that the taste is basically identical just the color looks slightly different.  He says it's very rare for them to carry the red ones.  After trimming off the ends repeatedly, we put the endives in ice water to chill.
Belgian Endives in cold water
The rest of the salad is very basic so I forgot to take more detailed images.  Dressing consists of the peach puree plus shallots, flat leaf parsley and a sherry vinegar.  The crunch in the salad is supposed to be the Marcona almonds, but I substituted pistachios instead because I couldn't find those almonds and it worked out really well in the salad.  Toss together the endives, arugula, peach slices, pistachios and some diced peaches along with the dressing and voila you are done!
Finished salad, looks yummy!
Tasting:
Very light and refreshing salad.   Peach dressing and puree really adds the sweetness needed to balance off the endives and arugula.  I just love the taste of arugula so I would've been fine even without the endives!  I think I could've used maybe only 2/3 of the endives because the portion was rather large even for 6 servings.  Super easy to make, so it's something that can be tossed together even for a week night meal.

Monday, February 21, 2011

Meatballs with Pappardelle

Something about meat balls and pasta that's always so comforting.  Abby (my friend's daughter) is a huge fan of it and for February I decided to satisfy her cravings as it's one of her most commonly ordered food items in a restaurant no matter where she goes.

This recipe is fairly involved as it calls for all 3 main ingredients - pasta, sauce, meat balls all to be home made.  I have never made a sauce or pasta from scratch before, so I know I am in for some challenges.  What's worse is that I don't have a pasta rolling machine or slicer, so I was most worried about the textures of the pasta but I decide to give it a go anyway.

First I started with the sauce, since it could have been made ahead of time.  I have to tell you this is the most aromatic and flavor-rich sauce I have ever tasted.  It took a lot of time, but really worth it.  Also everything is done in an oven, so you do have the benefit of doing other things while the sauce is cooking.  I started with finely chopped onions, leeks and fennels in the oven.  Yes that was a lot of chopping, a food processor definitely would have helped but I was too lazy to get that out.
Onions, Leeks and Fennel in the Oven
After the vegetables are baked for about 45 minutes, they become very caramelized and that's when I added  brown sugar and red wine vinegar.  Return the dish back to the over for another 20 minutes.  At this point, you can totally smell the richness aroma already in the house.  While this is cooking in the oven, I prepare the tomatoes.  The book called for canned San Marzano tomatoes, and luckily I was able to find those in my local market.  They were very expensive!!  Think almost 10x the cost of regular canned peeled tomatoes.  Reason being they are imported from a region by the same name in Italy, renowned for growing the best plum tomatoes for sauces.
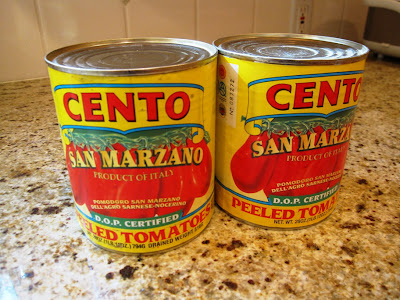
Imported San Marzano Tomatoes
After opening the cans, I picked out all the tomatoes and loosely chopped them as they were very soft.  There were quite a bit of juice/sauce left, I saved them for later use.  Look at the bright red colors!
Canned San Marzano Tomatoes
Drained and Chopped
The sauce also called the use of a flavoring sachet.  That was pretty easy to put together, a cheese cloth tied with bay leaves, pepper corns, thyme sprigs and some crushed garlic.
Flavor Sachet Ingredients
Flavor Sachet Tied with Butcher Twine
After baking the tomatoes along with the vegetables and the flavoring sachet, my entire house smelled like Italy :)  That's pretty much when my first group of friends arrived.  You are supposed to bake the entire sauce for 1.5 hours, stirring every 30 minutes.  The book warned the sauce is EXTREMELY thick and it is, as the flavor deepens with all the liquids evaporating.
After First 30 Minutes - Sauce Looked Rich Already
As the sauce is baking, I make preparations of the pasta dough.  I have to confess that I used a slightly different recipe here because I didn't have a pasta roller.  I searched online and found Homemade Pappardelle recipe from Mike Chiarello @ Food Network that didn't require a pasta machine.  The ingredients were extremely simple: regular flour, Semolina flour, oil and egg.  I made a well and poured the egg mixture in.
Pasta Dough Making - Egg Well
After kneeling the finished dough for 10 minutes, I separated into two halves and let the dough refrigerate and rest.
Pappardelle Pasta Dough
Next comes the meat ball preparation, too bad that's when I got really busy and forgot to snap pictures!  But the recipe basically called for 3 lbs of ground meat, I know that's a lot!  But it does make for decent sized meat balls (recipe called for 12, I ended up with 16 since I had a little extra meat).  The ground meat are suppose to be different kinds (sirloin, chuck, pork butt and veal!), but if you cannot find all these, you can pretty much substitute with 2 lbs of ground beef and 1 lb of ground pork.  After seasoning and adding in the bread crumb, I tested the meat mixture for seasoning, it did turn out to be not salty and flavorful enough, so I added a little bit of salt.  This is where I think the recipe could use some help in terms of the flavoring, as the meat mixture tasted somewhat bland - but it could be my Asian/Chinese inner self speaking as we almost always mix in a lot of seasoning with ground meat, in this case, since the sauce is so rich, maybe it's intended for the meat balls themselves to be fairly true to its simple taste.

The other twist to the meat balls is it's stuffed with fresh Mozzarella cheese.  I found this to be interesting as it added saltyness and flavor to the center of these large meat balls.
Meatballs stuffed with Mozzarella Cheese
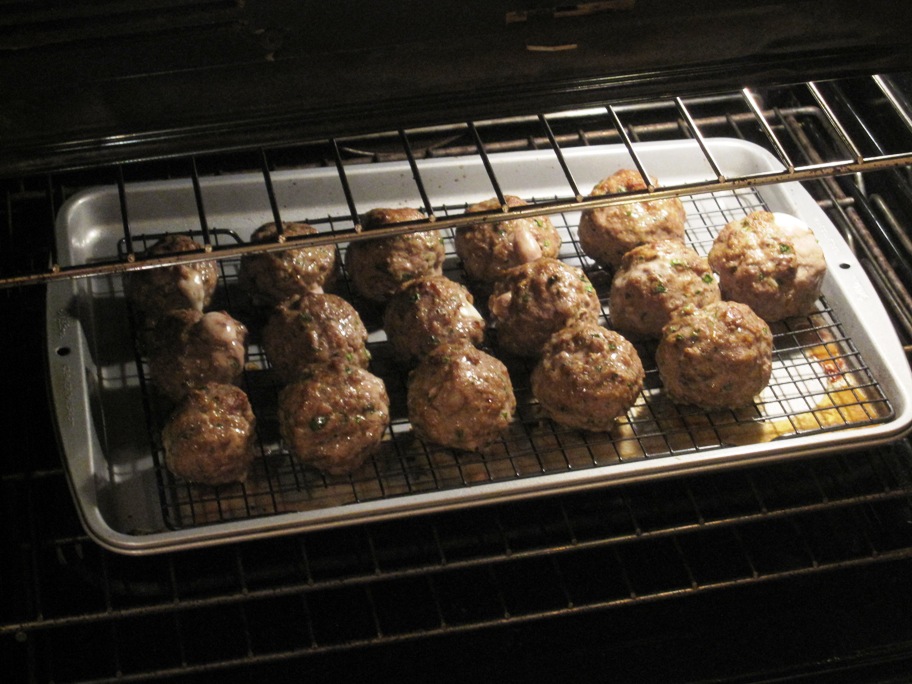
The meat balls are baked on a rack for about 18 minutes, it looked so very tasty!  You can see the cheese oozing through the meat.
Meatballs stuffed with Mozzarella Baking
Now we need to roll out the pasta dough for final cooking.  This is where I really wish I had a pasta maker.  My friend helped me muscle through the rolling and it still wasn't thin enough in the end, but we came pretty close.
Rolled Out Pasta Dough
After many hours of work, I put it all together.  Butter tossed pappardelle with fresh parsley, tomato sauce and meat balls all made from scratch is like match made in heaven.  They look and tasted amazing, especially the sauce with the rusty pasta.
Meatballs with Home Made Tomato Sauce
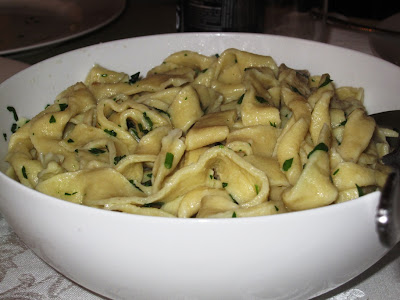
Home Made Pappardelle Pasta
Tasting:
The taste is definitely worth the effort.  Chewiness of the pasta worked well with the thick and rich tomato sauce.  I am not sure if I would be buying $40 tomatoes to make this sauce every time I make a pasta dish, but once in a while it's definitely worth the splurge.  The meat balls came out much more bland themselves than I imagined, but maybe because I had some high flying expectations.  I think the recipe kept the meat simple on purpose to high light the richness of the sauce, but if I am going to make this again, I would definitely kick up the seasoning in the meat.  Overall this was a very successful dinner and I really enjoyed the home made experience!  I would definitely like to own a pasta maker though to make things a bit easier.  :)

Green Bean and Potato Salad

It's time for my Thomas Keller dinner evening again and this time I decided to choose a salad since I cooked a soup entree the month before.  Flipping through the pages, this salad caught my eye as it looks delicious and fairly simple to prepare.  The black mission figs was definitely a plus but I knew even before I went shopping that I might not find the figs given it's middle of February.  Well as it turns out, my intuition was correct, the local market told me it won't be until around May/June, that they will carry fresh figs.  I decided to still go for the salad since the rest looked so good still.

I started with the green beans, after cleaning and clipping away the stems, I used the traditional vegetable blanch -> ice bath -> cooling method to cook them through.  The result is fabulous as always.  If you need a refresher on how this works, you can check out my broccoli rabe entry.
Cooked Green Beans
Then I move onto the potatoes.  The recipe called for fingering potatoes, and in my local market, I found these baby yukon golds that pretty much looked like what's photographed in the book.  They were indeed about 1 inch in diameter and was easy to cook and slice.
Baby Yukon Gold Potatoes
Next I toasted some walnuts in the oven and also used my brand new German made mandolin to cut very thin radish slices for the salad.  The mandolin worked like a charm and produced paper thin cuts!  I was very excited to leverage this apparatus for the first time and manage to have some success with it.  Notice I was also using anti-cut gloves since the radish was so small and difficult to grab onto with the safety glide.
Paper Thin Radish Slices with Mandolin
The dressing for the salad is a very easy to make, but did call for the use of a sherry vinegar, I had only the red wine vinegar on hand.  I did find sherry vinegar at whole foods, and it was expensive, but the taste was definitely worth it.
Sherry Wine Vinegar
The salad also called for Iberico ham which is a special Spanish ham made from the leg of the black Iberian pig, of course I couldn't find any of those so as the book suggested I substituted with a good prosciutto.  The final assembly was very easy, tossing the various ingredients together with the dressing and made for an elegant presentation.  One word of warning here, do not use tongs to toss this salad because of the delicate nature of the cooked beans and potatoes.  In general, Thomas Keller discourages the use of tongs as stated in the book, but for this salad it's especially true.
Finished Green Bean and Potato Salad with Prosciutto
Tasting:
Woah!  Where to start, such a simple salad but very delicious on many levels.  The sourness from the vinegar balances so well with the saltyness of the prosciutto.  And then there's the slight bitterness from the toasted walnuts and added crunch from the radish slices.  I can only imagine what it would be like with the fresh black mission figs!

Sauteed Broccoli Rabe

I actually made this a while back but never had a chance to post it.  I was getting bored of the regular side dishes and decided that I want to try something new.  Flipping through the book I came across this and decided I will go down to the local market to try to find broccoli rabe.  As it would turn out, even here in the bay area as part of northern California, it took me a while to find it.  As you can see from below, it looks quite different from broccoli or even broccolini.  

Broccoli Rabe (Bunched)
I quickly washed and separated the bunch.
Broccoli Rabe After Wash - Florets Visible
Next I followed the instructions by bringing a very large pot of water with a lot of salt to a boil and plunged the broccoli rabe into it.  What happens next is the way that Thomas Keller recommends for blanching any large amount of raw and leafy green vegetables.  It works very well as it maintains the texture and keeps the veggies looking very green and refreshing.  Don't be afraid to salt the water here as it really helps with the flavor.  The book also recommended doing this in batches if you had a lot of vegetable vs. the pot, but since I didn't have too many, I just put it all in together.
Broccoli Rabe Blanching in Large Pot of Salted Water
It took about 4 minutes to boil, until it was about right to my taste - tender but not mushy.  You then plunge the cooked broccoli rabe to an ice bath that was set up earlier.
Ice Bath Standing By
Inside the Ice Bath
After the ice bath stops the cooking process immediately, I used a cooling rack set on top of a baking sheet lined with paper towel to help dry off the vegetable.
Paper Towel Lined Cooling Rack on Baking Sheet
After the broccoli rabe completely dries off, I then sautee some garlic in my wok along with red pepper flakes.

Garlic with Red Pepper Flakes

After tossing the broccoli rabe inside, the result is a simple but amazing side dish.
Sauteed Broccoli Rabe with Garlic and Chile Flakes
Tasting:
Thomas Keller repeatedly says that we eat with our eyes first and he's right.  Cooking this vegetable using the blanch -> ice bath -> cooling rack method was very involved but it gave the broccoli rabe such a green color even after it was sauteed again later.  The taste was great also, it has a fairly strong bitter note at the very end, but it's nicely complimented by the heat given by the red pepper flakes.  It does remind me quite a bit of another vegetable that's very common in Chinese cooking - Gai Lan/Jie Lan (or known as Chinese broccoli)  I highly recommend serving this along side a steak or other kind of meat-heavy dish.